Now that all of the basic rooting guides are in place and you have everything you need to root your HTC Hero for Sprint, it is time that this blog begins a slow transition toward taking on a broader focus.
The new focus will be the Android system (as a whole) and, in time, the Windows OS.
Showing posts with label htc hero. Show all posts
Showing posts with label htc hero. Show all posts
Thursday, September 16, 2010
Wednesday, September 15, 2010
Verizon Radio on HTC Hero for Sprint?
Have you ever considered switching to Verizon because your Sprint signal is no good? Won't make the switch because of the price? I don't blame you. Sprint has, hands down, the best data packages available for the price. Nothing even comes close.
Wish you could have Verizon coverage for Sprint prices? You can!
Can you hear me now?
 Just like you don't need an Evo, or a Droid X, you don't need Verizon to get the best most out of an Android 2.2 phone. Let's flash a Verizon Radio onto our HTC Hero for Sprint!
WARNING: Everything posted on this blog has been tested and confirmed. That being said, if you brick your device, it's no one's fault but yours. No one is making you do any of this. Messing with Radios has, probably, the most bricking potential of anything you'll run into on this or other pages.
What you'll need:
1) Rooted HTC Hero for Sprint (CDMA HERO). Not Rooted? Everything you need to Root your HTC Hero for Sprint is over on the right in this blog's Archive. Start in August, 2010.
2) The Verizon Radio (Compliments to flipz at Geek For Me)
3) Some guts.
How to:
Step 1) Drop the Verizon Radio (zipped file) onto your sdcard's root directory (i.e. not in any folders). Like custom ROM's, Do Not Extract.
Step 2) Boot into your recovery image (i.e. boot into Nandroid, Clockwork recovery, etc.)
Step 3) Select - Apply sdcard:choose zip or Flash Zip from sdcard (depending on your recovery image) and then choose the Verizon Radio that you placed on your sdcard. Press HOME to confirm that you'd like to install it. The installer should walk you through the flashing of the new radio.
Step 4) Once the new radio is installed, you'll be back at the Nandroid Menu and it might say that it is clearing "cache..." Just wait a minute and then go ahead and - Reboot system now
That's it. You've got the Verizon radio on your HTC Hero for Sprint.
Tuesday, September 14, 2010
"Unroot" your phone (factory flash)
Unroot my phone? Why would I want to do this? Well, there are a number of reasons why someone might want to factory flash their phone:
Step 1: Download the RUU: Click here to download
Step 2: Plug your phone into the computer you've downloaded the RUU to (or the network) and set it to "Charge Only"
Step 3: On your computer, navigate to the HTC Sprint Hero MR 2.27.651.5.exe that you downloaded.
Step 4: Run HTC Sprint Hero MR 2.27.651.5.exe (which you downloaded in Step 1) and follow the prompts. This piece of software will walk you through "Upgrading" your phone down to the vulnerable build.
Please Note
1) This software will most likely fail to load the "bootloader" (you'll know what I mean when it happens). Just unplug your phone and plug it back in and run the software again.
2) This software will most likely fail somewhere else along the way. Just unplug your phone and plug it back in and run the software again. It WILL work, it simply requires a few shots at it. Do not worry, you are NOT bricking your phone.
3) Once there is success, your phone will reboot. As it's booting, it will run through the normal start up splash screens (HTC, quietly brilliant, Sprint Now Network, etc.) The phone will appear to hang on "NOW" for quite some time; just leave it alone, it will come around and finish up just fine.
There you have it. You're unrooted and have completed a factory reset.
- Need to send the phone if for repairs covered under warranty. You'll need your phone to be running the factory software and you'll need your phone to be unrooted. Sprint/HTC will reject your phone and void your warranty if you send them a phone that's been hacked up.
- Perhaps you loaded a custom ROM and forgot to make a backup of your phone's current state. Now all of a sudden, your phone is behaving badly, being buggy, etc. A factory reset will be your best (and sometimes only) fix.
- Your phone is totally messed up and really doesn't work at all anymore.
Step 1: Download the RUU: Click here to download
Step 2: Plug your phone into the computer you've downloaded the RUU to (or the network) and set it to "Charge Only"
Step 3: On your computer, navigate to the HTC Sprint Hero MR 2.27.651.5.exe that you downloaded.
Step 4: Run HTC Sprint Hero MR 2.27.651.5.exe (which you downloaded in Step 1) and follow the prompts. This piece of software will walk you through "Upgrading" your phone down to the vulnerable build.
Please Note
1) This software will most likely fail to load the "bootloader" (you'll know what I mean when it happens). Just unplug your phone and plug it back in and run the software again.
2) This software will most likely fail somewhere else along the way. Just unplug your phone and plug it back in and run the software again. It WILL work, it simply requires a few shots at it. Do not worry, you are NOT bricking your phone.
3) Once there is success, your phone will reboot. As it's booting, it will run through the normal start up splash screens (HTC, quietly brilliant, Sprint Now Network, etc.) The phone will appear to hang on "NOW" for quite some time; just leave it alone, it will come around and finish up just fine.
There you have it. You're unrooted and have completed a factory reset.
Thursday, September 9, 2010
Android 2.2 (Froyo) on the HTC Hero (CyanogenMod)
Sprint made it clear awhile back that the CDMA Hero would not support Android 2.2 (aka Froyo) while all of their other Android phones would. Why did Sprint decide to give up on the Hero? There's not a good answer to that question. A lot of folks in the development community claim it's because they want people to buy Evo (or some other 4g phone) and pay the $10/month "cool" tax. Whatever the reason may be, it's not stopping us from putting Android 2.2 on our HTC Hero.
So far, there has been no success in porting an Android 2.2 ROM with the HTC Sense UI, so if you were hoping to keep Sense then you're out of luck (for now). There has been success, however, in porting Android 2.2 and there are a number of themes out there that are just as convenient as Sense (though they don't have the Sense widgets or apps). Consider "Launcher Pro" if you need a "Sense-like" UI.
All that being said, let's get down to the task of getting Android 2.2 on our Rooted HTC Hero for Sprint.
What you'll need:
1) Rooted HTC Hero for Sprint: Option 1 or Option 2
2) Nandroid Backup Installed
3) Cyanogen's Mod (Android 2.2)
4) The Google Apps Addon pack (big thanks to Cyanogen and his people for making this possible)
5) The newest Sprint Radio
Alright, here we go:
Step 1) Place Cyanogen's Mod, Google Apps Addon, and the newest Sprint Radio on your phone's sdcard in the root directory (i.e. in the first level of your sdcard [not inside any folders]). Do not extract any of these files.
Step 2) Boot your phone into Nandroid using your method of choice.
Step 3) Make a backup of your phone's current state.
Step 4) Do a WIPE of your phone (- Wipe data/factory reset)
Step 5) Select - Apply sdcard:choose zip and then choose Cyanogen's Mod and press HOME to confirm that you'd like to install it.
Once the MOD is installed, you will be returned to the Nandroid Menu. Before rebooting your phone and having fun with Android 2.2, you'll want to install the Google Apps Addon you downloaded.
Step 6) Select - Apply sdcard:choose zip and then choose the Google Apps Addon and press HOME to confirm that you'd like to install it.
Once the Apps are installed, you will, once again, be returned to the Nandroid Menu. Before rebooting your phone, you also want to upgrade your radio (OPTIONAL).
OPTIONAL Step 7) Select - Apply sdcard:choose zip and then choose the new Sprint Radio and press HOME to confirm that you'd like to install it. The installer should walk you through the flashing of the new radio.
Once the new radio is installed, you'll be back at the Nandroid Menu and it might say that it is clearing "cache..." Just wait a minute and then go ahead and - Reboot system now
Your phone will reboot. You'll see the HTC splash screen (it may appear to hang on the HTC screen but don't worry). Next you'll see the Cyanogen splash screen. It WILL hang here for quite some time (on the first boot). Just be patient, your phone is just getting it's "first time" configuration. It may got back to the HTC splash screen and then back to the Cyanogen splash. This is all normal.
Eventually, you'll end up in your new Android 2.2 HTC Hero and you will be happy.


NOTE: this ROM works best after several restarts, so once you get your phone set up after the initial install, go ahead and reboot it once or twice.
And there you have it: Android 2.2 on your HTC Hero for Sprint. Take that Sprint.
Quick Review (9/17/2010): I've been running CyanogenMod on my phone now for 2 weeks and am nothing but pleased with its performance. It's very fast (faster than Zen Aria) and very stable. There are a few features that don't work all the time and the camera is still a little buggy but I don't use my HERO for a camera very often. The battery life seems a little better than the stock OS and a little better than ROMs running the Sense UI. Overall, this is a massive improvement on the stock HERO and with nightly updates, it's over-the-top. If there is one drawback, it would have to be that there is no Visual Voicemail.
Bottom Line: oh yeah, you want it.
RUMOR: There are folks in the development community who say that Sprint will be releasing an update to the HTC Hero in October 2010. Some think that this update will be Android 2.2 others do not think so. Sprint has been pretty clear about not wishing to load Android 2.2 but then again it's pretty clear that people are upset about this and it wouldn't be the first time the Sprint admitted a mistake. We'll see.
Tuesday, September 7, 2010
Rooting Option 2:
If Rooting Option 1 wasn't easy enough for you, it turns out that there is an even easier method... A "One Click" method!
Things you'll need.
1) An HTC Hero for Sprint
The How to's:
Step 1: download and install this apk to your HTC Hero for Sprint
Step 2: once it has successfully installed, run the app, read the disclaimer, and confirm
Step 3: reboot your phone.
Once rebooted your phone should have Darchstar's recovery and you should be able to boot into it using the reboot recovery method of your choice.
Step 4: use the recovery interface to flash custom ROMs, make backups, restores, etc.
Step 5: go into settings, and turn usb debugging on.
The developer of this app asks that after Step 5, you go into your phone's application settings and uninstall the app that you installed in Step 1.
Thursday, September 2, 2010
Task Killers and Memory Management
There are a lot of "task killers" and "memory management" tools available on the Android Market. The interesting thing about these "tools" is that they aren't particularly useful considering that Android (being Linux based) is extremely good at managing system resources.
Many folks think that because there is very little RAM available at any given time that too much is being used. "If only I could free up some RAM, my phone would be less sluggish." While this is a common belief, it's not supported by the facts.
Android allocates RAM (and other system resources) to active processes in much the same way as Linux. For example, suppose you are running a Linux system with 2gb of RAM. Assuming your distro is well designed, Linux will most likely decide to cache most of that 2gb and allocate it to active system processes. In effect, your system will have optimized its processes, allocating as much memory as possible to any given process. By opting to micromanage your systems memory, you are, in fact, taking memory away from active processes that would otherwise benefit from the extra resources. The same is true of your android phone.
With a stock HTC Hero for Sprint, the active OS is managing your memory. If, on top of this, you add some "tool" that allows micromanagement of active processes and system resources, what you are doing is competing with your system's configuration. In essence, you're playing back-seat-driver... and no one likes a back-seat-driver.
That being said, there are a number of custom ROMs in the community that come preloaded with tools that allow the root user to reconfigure the system's resource allocation tables. This is a totally different thing than what has been described above. In this case, the root user is given the opportunity to hook directly into the ROM and make adjustments at the most basic level... to actually drive.
Bottom line don't mess with system resources, trust the droid.
Wednesday, September 1, 2010
Installing a Custom Rom: Zen Aria Alpha 5
Now that we know how to use Nandroid to make backups and run system restores, it's time to take a look at installing a custom ROM.
What is a custom ROM? The best way to think of a custom ROM is to think of it as a new operating system for your android phone. Some are faster than others. Some offer more features that others. But for the most part, all of the custom ROM's out there in the development community are superior to the stock ROM that came loaded on your HTC Hero for Sprint.
So, what we want to do is load a custom ROM.
The first step in loading a custom ROM is choosing the ROM you want to load. For this tutorial, we are going to use the Zen Aria ROM.
Step 1: download the ROM. The Zen Aria ROM that we'll be using in this tutorial is available here.
Step 2: place the ROM in on your phone's sdcard in the root directory (that's the main folder [i.e. not inside some other folder]).
Step 3: boot into Nandroid using your method of choice and make a backup of your currant system. Once your backup is complete, move on to Step 4.
Step 4: for most ROMs, at this point you will want to WIPE your phone by selecting - Wipe data/factory reset, however the Zen-Aria ROM that we are installing will go ahead and do this for us during install, so we can just skip this step and move right along to Step 5.
Step 5: once your backup is finished, select - Apply sdcard:choose zip from the Nandroid menu.
You will get a list of the ROM's that are on your sdcard.
Step 6: select Zen-Aria_Alpha5-D-signed.zip
You will be prompted to install this ROM and you should accept the prompt using the HOME key.
The ROM will self install from this point and will then land you, once again in the Nandroid main menu.
Step 7: select - Reboot system now
The first system reboot on the Zen Aria ROM is painfully slow. It can take up to 10 min for it to complete. Just wait it out. It may appear to be hung on the HTC screen; never fear, it will move along and finish up beautifully.
Quick Review of Zen Aria.

This ROM is incredibly fast. If you are mirgrating to it from a stock HTC Hero for Sprint, you will be shocked by how smooth this ROM is. There is virtually no sluggishness. As you can see, it is build on the Sense UI which I was a little worried about at first (not being a big fan of sense) but I prefer the styling on this quite a bit and, again, it's way zippier than the stock sense UI. I just installed it on my phone 30min ago, so I'm not sure how hard it is on the battery. I know that it overclocks the phone's CPU slightly so that might have some kind of effect, though, from what I can tell, the development community is absolutely swooning over this build. I'm looking forward to running this for a few days at least and may make a more permanent switch.
Bottom Line: Even with the Sense UI, this ROM is a Ferrari and stable enough for everyday use.
UPDATE (Sept. 3, 2010): The one drawback that I've noticed with this ROM is that on restart, the HTC screen will really hang for a long time. Sometimes it hangs for up to half an hour which is, in my opinion, unacceptable. I'm sure this will be fixed in the next update. I'm told that the hang time is due to sense UI having difficulty loading.
Tuesday, August 31, 2010
Wireless Tether (Mobile Hotspot)
Maybe you thought that you needed an Evo 4G or a Droid X or some other "new" smart phone to do things like wireless tether (mobile hotspot). Well you don't. Your HTC Hero for Sprint supports wireless tether... you just need to root it first.
To root your HTC Hero for Sprint, read my "rooting" posts. They are all in the August 2010 archive on the right side of this page.
Once you have root privileges on your phone, you can run apps that "normal" Hero users cannot. One such app is Wireless Tether for Root Users by Müller, Lemons and Buxton. Just go to the Android app market with your rooted HTC Hero, download and install this gem and...
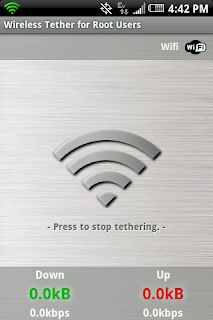
...vwala!
This app works great. While I haven't spent enough time using it to tell you how hard it is on your battery (without a doubt, it's hard on it), I can tell you that the connection speeds are zippy enough for casual web browsing and the tether is pretty "tight" (i.e. not a lot of packet loss). This app would be great for doing some work on the train or the passenger seat of a car. Best of all, this is a FREE mobile hotspot / wireless tether app. There are not additional fees associated with using this!
UPDATE (9/21/2010): I just found out that Sprint actually charges users an additional monthly fee to access mobile hotspot on supported phones! This wireless thether app for mobile hotspot is free and there are no fees. The joys of root.
In future posts, I will explore a wide variety of root user apps as well as custom ROMs.
Backups and Recoveries: Using Nandroid
Because we rooted our HTC Hero for Sprint using the unrevoked method, we still have not made it possible to use Nandroid to make backups, run recoveries, and install custom ROMs. If you want to run a custom ROM, you'll need to be able to use Nandroid and so, you'll want to read through this post.
Please Note: If you haven't rooted your HTC Hero for Sprint yet, you'll want to read my Rooting Option 1 post. The following is only possible with a rooted phone.
So, we want to be able to use Nandroid. Nandroid is something like a BIOS and you'll need it to change boot settings, wipe your device, load ROMs, do backups, restores, etc.
How to's:
Step 1: Plug your rooted HTC Hero for Sprint into the computer that you put the Android SDK on and set it to "Disc Drive" (Don't have the android SDK? Read my "What You'll Need" post to get it.) Make sure you turn USB Debugging ON (on your phone: Home-> Menu-> Settings-> Applications-> Development-> USB debugging.)
Step 2: Download the android recovery-RA-heroc image here and save it to your phone's sim card at the root directory. In other words, save it to the sim card but don't put it in any folders. It should be in the main directory along with all your other folders.
Now we're really going to start hacking at your phone. Remember that you are doing this at your own risk.
All computer command line calls will be in blue, bold, and italics.
Step 3: On you computer, launch your command prompt (terminal for linux users and I don't really care what it is for apple people). If you don't know how to launch a command prompt, just go to the "start button" and run "cmd" (for XP users) or just type "cmd" in the search field for Vista/Win 7 users.
Step 4: Now we want to change directories so that we are hanging around our Android SDK tools. In your command prompt type: cd C:\...\android-sdk-windows\tools
and hit "Enter". The "..." is whatever path leads to your android sdk folder. If this is new to you or you don't understand this, I highly recommend you stop now and enjoy your rooted phone as it is.
Your command prompt should now read: C:\...\android-sdk-windows\tools>_
Step 5: We now want to launch some shell code but first we want to confirm that our SDK tools see your phone. In your command prompt, type: adb devices
and hit Enter
You should see a List of attached devices and your device's serial number.
Step 6: We launch our shell: adb shell
and hit Enter
You should now see a $ and a cursor
Step 7: We switch to root user: su
and hit Enter
You should now see a # and a cursor. Note: if you don't see a #, look at your phone and see if it is prompting you to give any permissions. If it is, allow.
Step 8: Now we want to flash the recovery image that we put on the sdcard back in Step 2. To do this, we're going to envoke some root power after we hop onto our phone's microSD care: cd sdcard
and hit Enter
You should now see a #
Step 9: A good way to make sure that we are in the right place is to list the directories and files where we are. We'll do that my calling for a list: ls
and hit Enter
Command Prompt should list the local directories and files for the sdcard root folder. You should see "recovery-RA-heroc-v1.2.3.img" among them. If not, go back to Step 2 and be sure that you've placed this image on your phone's sdcard.
Step 10: We are now going to flash this recovery image in order to create our Nandroid directory: flash_recovery recovery-RA-heroc-v1.2.3.img
and hit Enter
Nothing too exciting will happen. Command prompt might return this call in text form and then should just leave you again with a # awaiting your next command.
Step 11: Now, we will are going to visit our newly created nandroid folder by forcing our phone to boot into it: reboot recovery
and hit Enter
Your phone will reboot into the nandroid interface. From here you will be able to make backups of your phone, restore your phone from these backups, wipe system data and, most importantly, install custom ROMs. I will cover all of this in a later post.
If any of this didn't work, please let me know in the comments field or, if you know me, let me on Facebook or something.
Rooting Option 1:
WARNING: by rooting your phone, you are choosing to void your phone's warranty. Proceed at your own risk. Know that you are choosing to do this. No one is making you. Further, you are the one doing this, not me.
Ok, so now that we have successfully migrated to build 2.27.651.5 our HTC Hero for Sprint is "vulnerable" to rooting. The rooting option that we will explore in this post is the "unrevoked" option. This is, by far, the easiest option for rooting the phone. I will explore a more "hands on" or traditional exploit in a later post for anyone who is interested in how to exploit 2.27.651.5's vulnerability from the command line.
For now, let's root our HTC Hero using the unrevoked method.
IMPORTANT NOTE: if you have not already migrated to build 2.27.651.5 or have no idea what I'm talking about, click here. You will NOT be able to root your phone using this method if you have not reverted to 2.27.651.5.
If you know that you are running 2.27.651.5 then move on to Step 1.
Step 1: Plug your phone into your computer using your USB cable.
Step 2: Set your phone to "Charge Only".
Step 3: On your phone, navigate to http://unrevoked.com/m/
Step 4: Tap to download the unrevoked exploit.
Step 5: Once the download is complete, install the unrevoked app.
Step 6: Once the unrevoked app is installed, go to your apps collection and run the unrevoked app.
Step 7: Tap "Start" and let the app exploit your phone's vulnerability.
After Step 7, you should get confirmation that your phone has been rooted.
Step 8: Go to your apps tray. Inside you should find the "Super User" app (Little Ninja with a Gun). Tap this app and you will be asked to set a permission. Approve it and your phone is officially rooted.
While it's true that your phone is rooted and that you can take advantage of apps that require root privileges there are some further steps that you need to take in order to get the most of your rooted HTC Hero.
In the next post, we will look at Nandriod, making backups and restoring backups. Knowing how to work with Nandroid is absolutely essential for loading custom ROMs.
If Software Number > or = 2.27.651.6 Then:
Sprint or HTC or someone patched the vulnerability in the HTC Hero for Sprint that we want to exploit in order to gain root access. Lucky for us, when we read the "What You'll Need" post on this blog, we went and got the "vulnerable" build (2.27.651.5) and, so, will not be bothered by this patch because we are going to "upgrade" our HTC Hero down to a more vulnerable state (vulnerable to rooting that is).
It should also be noted that this is a standard upgrade procedure. When upgrading an android device, the device itself may prompt you to upgrade (which all you have to do is tap accept, or go, or whatever) or you can download the upgrade to a computer and follow the instructions below. The only difference between a standard upgrade and what we will be doing is that with a standard upgrade, you are migrating to a newer software version whereas we want to migrate to an older version. The how-to's, however, do not change.
2.27.651.6 Workaround
Step 1: Plug your phone into your computer using the USB cable that came with it.
Step 2: Set your phone to "Charge Only".
Step 3: On your computer, navigate to the HTC Sprint Hero MR 2.27.651.5.exe that you downloaded (haven't downloaded it? do that now by clicking here: HTC Sprint Hero MR 2.27.651.5.exe).
Step 4: Run HTC Sprint Hero MR 2.27.651.5.exe and follow the prompts. This piece of software will walk you through "Upgrading" your phone down to the vulnerable build.
Please Note
1) This software will most likely fail to load the "bootloader" (you'll know what I mean when it happens). Just unplug your phone and plug it back in and run the software again.
2) This software will most likely fail somewhere else along the way. Just unplug your phone and plug it back in and run the software again. It WILL work, it simply requires a few shots at it. Do not worry, you are NOT bricking your phone.
3) Once there is success, your phone will reboot. As it's booting, it will run through the normal start up splash screens (HTC, quietly brilliant, Sprint Now Network, etc.) The phone will appear to hang on "NOW" for quite some time; just leave it alone, it will come around and finish up just fine.
Final Note
If you're like me, you might be wondering if your phone will still be able to make and receive calls to your phone number, send texts and do data. It can. My guess is that the phone's radio is matched to the serial number which is, in turn, matched to Sprint's brain. Your phone will work fine for phone duties...
...but is now vulnerable to rooting!
What You'll Need
You'll need a number of things to successfully root your HTC Hero for Sprint.
Things you'll need:
IMPORTANT
To determine whether you need this last object, you'll need to have a look at your phone:
From your home screen, press "Menu" and tap "Settings".
Scroll down and tap "About Phone".
Scroll down and top "Software Information".
If your Software Number is: 2.27.651.6 (or higher) download this to your computer NOT your phone:HTC Sprint Hero MR 2.27.651.5.exe
Android SDK
Now that you've downloaded the Android SDK, you'll need to extract it and if you're not comfortable working from the command line, you'll want to extract it to a location on your disc that isn't too dark. A really convenient place to extract the SDK to would be C:\ but for the purposes of these tutorials, I'll always refer to the directory in which the SDK is stored as C:\...\android-sdk-windows (if you're having trouble at this point, I suggest not attempting to root your phone).
Things you'll need:
- HTC Hero for Sprint
- A USB cable (came with your phone).
- A computer (it's right in front of you).
- The Android SDK for your OS.
- HTC Sync 2.0.40 (or higher)
IMPORTANT
To determine whether you need this last object, you'll need to have a look at your phone:
From your home screen, press "Menu" and tap "Settings".
Scroll down and tap "About Phone".
Scroll down and top "Software Information".
If your Software Number is: 2.27.651.6 (or higher) download this to your computer NOT your phone:HTC Sprint Hero MR 2.27.651.5.exe
Android SDK
Now that you've downloaded the Android SDK, you'll need to extract it and if you're not comfortable working from the command line, you'll want to extract it to a location on your disc that isn't too dark. A really convenient place to extract the SDK to would be C:\ but for the purposes of these tutorials, I'll always refer to the directory in which the SDK is stored as C:\...\android-sdk-windows (if you're having trouble at this point, I suggest not attempting to root your phone).
Getting Started
This blog will start by focusing on the basics of rooting an HTC Hero for Sprint (cdma Hero) and then move through to more advanced user option with a rooted phone. For example, we'll take a look at loading a custom ROM (user interfaces created in the development community). I will try to answer questions or comments as they appear, though I'll most likely refer questions to the appropriate forum.
Subscribe to:
Comments (Atom)